How to Break in Hockey Skates, Properly breaking in hockey skates is essential for comfort, performance, and injury prevention on the ice. New skates can be stiff and uncomfortable initially, but with the right techniques and patience, you can mold them to fit your feet perfectly. In this article, we will guide you through the process of breaking in hockey skates to ensure a comfortable and customized fit that maximizes your performance on the ice.
How to Break in Hockey Skates
Step 1: Wear the Skates Around the House
Wearing the skates around the house is an important step in the process of breaking in hockey skates. It involves putting on the skates and wearing them indoors for short periods of time before hitting the ice. This step allows your feet to gradually get accustomed to the shape and feel of the skates.
By wearing the skates around the house, you are giving your feet an opportunity to adjust to the boot’s stiffness and the overall fit. This initial wearing helps to break in the skates and soften any rigid areas. It also allows your foot to begin molding the boot to its natural shape, ensuring a more comfortable and personalized fit.
During this stage, it’s important to lace up the skates snugly but not overly tight. The goal is to provide support and start the molding process, but not to restrict blood circulation or cause discomfort. It’s normal to feel some initial tightness or pressure points, but they should gradually lessen as you continue wearing the skates.
Wearing the skates around the house for short intervals also gives you an opportunity to identify any areas of discomfort or potential issues. Pay attention to any pressure points, rubbing, or tight spots. This feedback will help you make adjustments or seek professional assistance if necessary.
Remember, the purpose of wearing the skates around the house is to initiate the breaking-in process gradually. It allows your feet and the skates to start adapting to each other before taking them on the ice. This step sets the foundation for a more comfortable and personalized fit, enhancing your overall skating experience.
Step 2: Heat Mold the Skates
Most modern hockey skates are heat moldable, meaning they can be custom-fitted to your feet through the application of heat. Follow the manufacturer’s instructions to heat mold your skates. Typically, this involves baking them in an oven at a specific temperature for a designated duration. Once heated, put on the skates and tighten the laces firmly, allowing them to cool and conform to the shape of your feet.
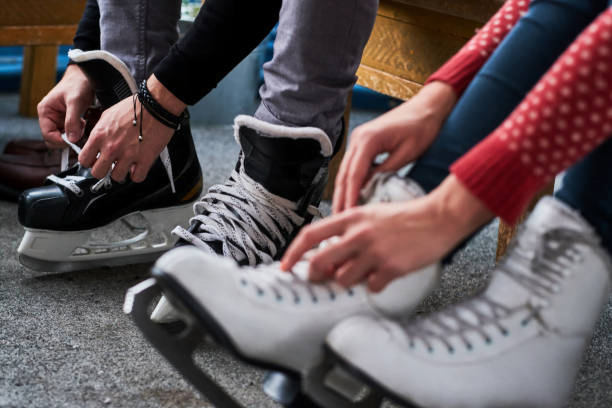
Step 3: Lace Up Properly
Lacing up your hockey skates properly is crucial for achieving a secure and comfortable fit that provides adequate support and stability on the ice. Here’s a step-by-step guide on how to lace up your skates properly:
- Begin by loosening the laces on your skates completely. This ensures that you have enough room to insert your foot comfortably.
- Slide your foot into the skate boot and position it properly, ensuring that your heel is all the way back in the boot and your toes are not crammed at the front.
- Start lacing up from the bottom of the skate. Pull the laces tight but not excessively so. You want them to be snug but still allow for proper circulation.
- Move up to the next set of eyelets and cross the laces over each other, creating an “X” pattern. Pull the laces tight, evenly distributing the tension across the boot.
- Continue lacing up, crisscrossing the laces and pulling them snugly but not too tight. This pattern helps provide even pressure distribution and support to your foot.
- As you reach the top eyelets, make sure to create a secure lock at the ankle. To do this, take the lace on one side and insert it through the top eyelet on the opposite side, creating a loop. Repeat the process on the other side, so both sides have loops.
- Cross the loops over each other and insert the lace through the loop on the opposite side. Pull the loops tight to create a firm and secure lock.
- Tie a double knot at the top to prevent the laces from coming undone during skating. Make sure the knot is tight but not overly constricting.
- Take a moment to assess the overall fit of your skates. They should feel snug and secure, providing ample ankle support while still allowing for some flexibility and movement.
- Walk around in your skates to ensure they feel comfortable and secure. If you notice any pressure points or areas that feel too tight, adjust the laces accordingly to alleviate the discomfort.
Step 4: Gradually Increase Ice Time
Gradually increasing ice time refers to the practice of slowly increasing the duration and intensity of your skating sessions over time as you break in your hockey skates. It is an important step in the process to allow your feet and the skates to adjust to each other gradually.
When you first start wearing new skates, your feet may not be accustomed to the tightness and stiffness of the boot. They may need time to adapt and develop calluses in certain areas. By gradually increasing the amount of time you spend on the ice, you allow your feet to get used to the skates without overwhelming them.
During the initial sessions, start with shorter ice time, such as 15-20 minutes, and gradually increase it over subsequent sessions. This gradual approach helps to minimize the risk of discomfort, blisters, or foot-related issues that can arise from prolonged or intense skating in new skates.
By gradually increasing ice time, you give your feet a chance to adjust to the pressure points and areas that may still be tight. It also allows the skate’s materials to break in and mold to the shape of your feet more effectively. This process helps improve overall comfort, reduces the risk of injuries, and allows you to gradually build up your skating endurance and performance.
Remember to pay attention to any discomfort or pressure points during the breaking-in period. If you experience excessive pain or discomfort, it’s important to take a break, rest, and assess whether adjustments or professional assistance are needed to optimize the fit of your skates. Your comfort and safety on the ice should always be a priority.
Step 5: Use Protective Measures
To aid in the breaking-in process and prevent discomfort, consider using protective measures such as gel pads or moleskin on areas that are prone to irritation or blistering. These can provide cushioning and alleviate pressure points during the adjustment period.
Step 6: Consult a Professional
If you’re experiencing persistent discomfort or fit issues, it may be helpful to consult a professional skate fitter or a knowledgeable hockey shop staff. They can provide expert advice, assess your skates, and suggest additional modifications or adjustments to optimize fit and comfort.
Conclusion
Breaking in hockey skates is a necessary process to ensure a comfortable and customized fit. By wearing them around the house, heat molding, lacing up properly, gradually increasing ice time, and using protective measures, you can achieve the perfect fit for your feet. Remember to consult a professional if needed for further guidance. With well-fitted skates, you’ll enjoy enhanced performance and minimize the risk of foot-related issues on the ice.
More Posts
How to Place Successful Football Bets
How to Draft a Winning Fantasy Football Team
How to Stay Updated with IPL News and Player Performances
How to Improve Your Football Skills
FAQs
Q: How long does it take to break in hockey skates?
A: The time it takes to break in hockey skates can vary depending on factors such as the skate model, materials used, and individual foot shape. Generally, it can take a few ice sessions to a few weeks for the skates to fully mold to your feet.
Q: Are all hockey skates heat moldable?
A: Not all hockey skates are heat moldable. Higher-end models often have heat moldable properties, while lower-end skates may not offer this feature. Check with the manufacturer or consult a professional to determine if your skates are heat moldable.
Q: Can I speed up the breaking-in process?
A: It’s important to allow the breaking-in process to occur naturally to ensure the skates conform properly to your feet. Rushing the process or using extreme measures can potentially damage the skates or lead to discomfort on the ice.
Q: Can I break in hockey skates without heat molding?
A: While heat molding provides a more customized fit, you can still break in hockey skates without heat molding by wearing them around the house, gradually increasing ice time, and making adjustments as needed. However, heat molding can greatly expedite and enhance the breaking-in process.
Q: Can I use someone else’s heat-molded skates?
A: Heat-molded skates are specifically molded to fit an individual’s foot shape. Using someone else’s heat-molded skates may not provide a proper fit and could lead to discomfort or performance issues. It’s recommended to get skates that are heat-molded specifically for your feet.
Remember, each skater’s experience may vary, and it’s essential to listen to your body during the breaking-in process. If you experience severe pain or discomfort, consult a professional for further assistance. Enjoy your well-fitted skates and have a great time on the ice!


One Comment